
I think we are ready to figure out our recipes... not that the melt and pour method (our first try) requires a lot of parameters to work through. I wanted to provide you with lots of ideas - so will be including recipes that are very different in nature.
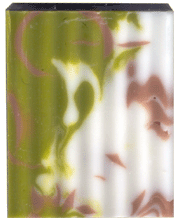 El Don Soap Bar (Intermediate skill level)
Ingredients: Commercial crafting melt and pour soap base, cosmetic grade colorants, soap fragrance (Leather, Masculine Musk, Juicy Lime, Green Tea (Soap Crafters), Sandalwood, Frankincense, Myrhh).
Canola Harvest cooking spray used for mold release. 70% rubbing alchohol sprayed on for soap layer adhesion and bubble reduction.
This batch was made mostly from leftovers that already had some fragrance in it. I added some extra Frankincense and Sandalwood during Step 3. All of the color mixes I used in this soap were opaque.
------------------------------------------------------------------------------------------------------------------------
Cocoa Vanilla Layered Soap Recipe (Intermediate skill level)
 Submitted By:
Aaron of Mulberry, FL
Submitted By:
Aaron of Mulberry, FL
2 oz white melt & pour
10 drops chocolate fragrance
10 drops vanilla fragrance
Cocoa powder or brown colorant
In another pan melt the white soap. To this you may add a little shea butter or coconut oil. Allow the melted base to slightly cool and then add vanilla fragrance oil. After letting it cool a few more minutes, pour over the cocoa colored soap.
Let the soap sit for a few hours to firm. Overnight would be best. Pop out and voila! Layered Chocolate-Vanilla Soap! Some other ideas are: Chocolate-Peppermint Honey-Almond Lemon-Orange Mango-Shea Use your imagination!
Many people like layering either scents and / or textures. This one allows for mixed scents and a pretty change of color. Consider some of your favorite combinations - Cinnamon / Cloves, Apples / Cinnamon, Orange / Cream, Blueberries / Cream, etc... This one came from http://www.fromnaturewithlove.com/recipe/recipe.asp?recipe_id=328 and they have some great ideas.
------------------------------------------------------------------------------------------------------------------------
Oatmeal Soap (Beginner skill level)
 (1) Melt 8 oz. of white/opaque base
(2) Melt 8 oz. of clear base
(3) Optional: Grind up 1/2 oz. of Oatmeal in coffee grinder for a smoother,
lighter exfoliation. Also, the smaller the particle, the easier to suspend in the soap.
(4) Combine the two bases
(5) Add your fragrance oil - approximately 1/2 oz. (Oatmeal, Milk and Honey is a good one!) and stir in well
(6) Optional: Add colorant
(7) Add the oatmeal and stir. Wait 20 or 30 seconds - is the oatmeal sinking to the bottom of your bowl/Pyrex or is it staying suspended. If it is staying suspended, skip to step 8
(8) If the oatmeal is sinking, this simply means that your base is not thick enough to support the oatmeal. Either cover the bowl/Pyrex with saran wrap and wait for the base to cool, or stir the melted base until it is becomes thick enough to suspend the oatmeal.
(9) Pour your oatmeal soap into molds
(10) Spritz with alcohol to finish the soap and break up any bubbles on the top of the soap
(11) Wait 2 to 3 hours (or even better, overnight!) to pop the soap out of the molds. Wrap with saran wrap and you're done!
I LOVE oatmeal soap. It is one that I have in my shower always. It is a wonderful exfoliant and it aids in clearing up acne and softening skin naturally. I prefer to have LOTS of oatmeal in my soap and for it to be roughly ground. This recipe came from http://www.teachsoap.com/recipes.html
------------------------------------------------------------------------------------------------------------------------
Loofah Soap (Beginner skill level)
You will need :
a loofah
melt and pour soap
A spray bottle full of water
fragrance or essential oil (optional)
liquid color (optional)
A shallow dish( like a jelly roll pan). It should be a little larger than the length of your loofah.
Some small disposable plastic plates
Melt a small amount of CLEAR soap and pour it into your shallow dish. Spritz your loofah with water until damp. Take the loofah and roll it in the soap, so that it completely coats it. Set it on some wax paper to dry.
After it has dried and set, cut into slices. Melt some more CLEAR soap and pour a small layer onto each plastic plate. Take the loofah pieces and set one of the cut ends into the layer of soap while it is still soft. (One loofah per plate)This will seal your soap on one end. (I tried just wrapping some plastic wrap around the end instead, but it didn’t work.) Melt some more soap, color and fragrance it and fill the loofah. It works best if you pour it in after the soap is cool enough to form a light skin on the top.
This one looks definitely interesting. I will have to get some natural loofahs and try it out. This recipe came from http://www.soapcrafters.com/how_to_make_loufa_soap and there are other options on the page. Here is another page where they show step by step photos which helps. http://candleandsoap.about.com/od/soaprecipes/ss/loofahsoap.htm
If you have any recipes you would like to share... please reach out to me. I would love to hear about them. Blessings... E
El Don Soap Bar (Intermediate skill level)Ingredients: Commercial crafting melt and pour soap base, cosmetic grade colorants, soap fragrance (Leather, Masculine Musk, Juicy Lime, Green Tea (Soap Crafters), Sandalwood, Frankincense, Myrhh).
Canola Harvest cooking spray used for mold release. 70% rubbing alchohol sprayed on for soap layer adhesion and bubble reduction.
This batch was made mostly from leftovers that already had some fragrance in it. I added some extra Frankincense and Sandalwood during Step 3. All of the color mixes I used in this soap were opaque.
- Mix up a batch of light brown soap, about the color of hot chocolate. Pour into a container and let it harden.
- Cut curls from the light brown with a melon baller or your curl-cutting tool of choice. Fill a suitable container or loaf mold with the curls, spraying periodically with rubbing alcohol or Bubble Buster. I used a large yogurt container for this project.
- Mix one batch of pearly white soap and one batch of pearly green soap in separate glass measuring cups. You'll be pouring these two colors simultaneously, so try to melt them at the same time and get them to the same state of liquidity at the same time. It doesn't have to be exact, just close. Add fragrance now.
- Let the two melted batches start to form a skin on top.
- Remove the skin, then pour both batches at the same time, one on each side of the mold. Don't move the cups much while you pour if you want a two-tone effect like my sample.
- Gently tap the sides to dislodge any bubbles and allow them to float to the top. Use the alcohol or Bubble Buster to break bubbles on the surface.
- Let the mold sit undisturbed until the soap is hard. Such a large chunk of soap might take several hours to harden completely. To be safe wait until it has cooled off completely and then wait some more. It will be worth the wait!
- Pop the loaf out of the mold, slice, and enjoy!
------------------------------------------------------------------------------------------------------------------------
Cocoa Vanilla Layered Soap Recipe (Intermediate skill level)
 Submitted By:
Summary:
A pretty layered soap
Ingredients:
2 oz clear melt & pour base2 oz white melt & pour
10 drops chocolate fragrance
10 drops vanilla fragrance
Cocoa powder or brown colorant
Instructions:
Melt the clear soap in double boiler and add the cocoa powder
to get a nice deep brown color and a natural cocoa scent. Alternatively, you
could also let the clear MP cool slightly and form a light skin, then sprinkle
it liberally with the cocoa powder and swirl loosely with a toothpick before
pouring. This will cause a swirl effect of chocolate instead of a clear brown.
Let it cool briefly. Add 10 drops chocolate fragrance oil if you wish. *You may
wish to make this bar extra special by adding a little cocoa butter to the brown
batch*. Pour into a mold, filling halfway up. Let the clear sit for about twenty
minutes until it is slightly tacky at the top. In another pan melt the white soap. To this you may add a little shea butter or coconut oil. Allow the melted base to slightly cool and then add vanilla fragrance oil. After letting it cool a few more minutes, pour over the cocoa colored soap.
Let the soap sit for a few hours to firm. Overnight would be best. Pop out and voila! Layered Chocolate-Vanilla Soap! Some other ideas are: Chocolate-Peppermint Honey-Almond Lemon-Orange Mango-Shea Use your imagination!
Many people like layering either scents and / or textures. This one allows for mixed scents and a pretty change of color. Consider some of your favorite combinations - Cinnamon / Cloves, Apples / Cinnamon, Orange / Cream, Blueberries / Cream, etc... This one came from http://www.fromnaturewithlove.com/recipe/recipe.asp?recipe_id=328 and they have some great ideas.
------------------------------------------------------------------------------------------------------------------------
Oatmeal Soap (Beginner skill level)
(2) Melt 8 oz. of clear base
(3) Optional: Grind up 1/2 oz. of Oatmeal in coffee grinder for a smoother,
lighter exfoliation. Also, the smaller the particle, the easier to suspend in the soap.
(4) Combine the two bases
(5) Add your fragrance oil - approximately 1/2 oz. (Oatmeal, Milk and Honey is a good one!) and stir in well
(6) Optional: Add colorant
(7) Add the oatmeal and stir. Wait 20 or 30 seconds - is the oatmeal sinking to the bottom of your bowl/Pyrex or is it staying suspended. If it is staying suspended, skip to step 8
(8) If the oatmeal is sinking, this simply means that your base is not thick enough to support the oatmeal. Either cover the bowl/Pyrex with saran wrap and wait for the base to cool, or stir the melted base until it is becomes thick enough to suspend the oatmeal.
(9) Pour your oatmeal soap into molds
(10) Spritz with alcohol to finish the soap and break up any bubbles on the top of the soap
(11) Wait 2 to 3 hours (or even better, overnight!) to pop the soap out of the molds. Wrap with saran wrap and you're done!
I LOVE oatmeal soap. It is one that I have in my shower always. It is a wonderful exfoliant and it aids in clearing up acne and softening skin naturally. I prefer to have LOTS of oatmeal in my soap and for it to be roughly ground. This recipe came from http://www.teachsoap.com/recipes.html
------------------------------------------------------------------------------------------------------------------------
Loofah Soap (Beginner skill level)
You will need :
a loofah
melt and pour soap
A spray bottle full of water
fragrance or essential oil (optional)
liquid color (optional)
A shallow dish( like a jelly roll pan). It should be a little larger than the length of your loofah.
Some small disposable plastic plates
Melt a small amount of CLEAR soap and pour it into your shallow dish. Spritz your loofah with water until damp. Take the loofah and roll it in the soap, so that it completely coats it. Set it on some wax paper to dry.
After it has dried and set, cut into slices. Melt some more CLEAR soap and pour a small layer onto each plastic plate. Take the loofah pieces and set one of the cut ends into the layer of soap while it is still soft. (One loofah per plate)This will seal your soap on one end. (I tried just wrapping some plastic wrap around the end instead, but it didn’t work.) Melt some more soap, color and fragrance it and fill the loofah. It works best if you pour it in after the soap is cool enough to form a light skin on the top.
This one looks definitely interesting. I will have to get some natural loofahs and try it out. This recipe came from http://www.soapcrafters.com/how_to_make_loufa_soap and there are other options on the page. Here is another page where they show step by step photos which helps. http://candleandsoap.about.com/od/soaprecipes/ss/loofahsoap.htm
If you have any recipes you would like to share... please reach out to me. I would love to hear about them. Blessings... E
No comments:
Post a Comment